After running a simulation, you'll interact with plot windows to explore results such as Levels, Flow Rates, and Production charts. These plots support zooming, panning, and region selection through mouse gestures. This page covers how to work with the charts, including the context menus available on each axis and the chart area.
Panning
Hold the left mouse button and drag to pan around the plot. This moves the visible area without changing the zoom level.
Rectangle Drag (Zoom to Region)
Right-click and drag to draw a rectangle over the area you want to inspect. When you release, the plot zooms to that region.
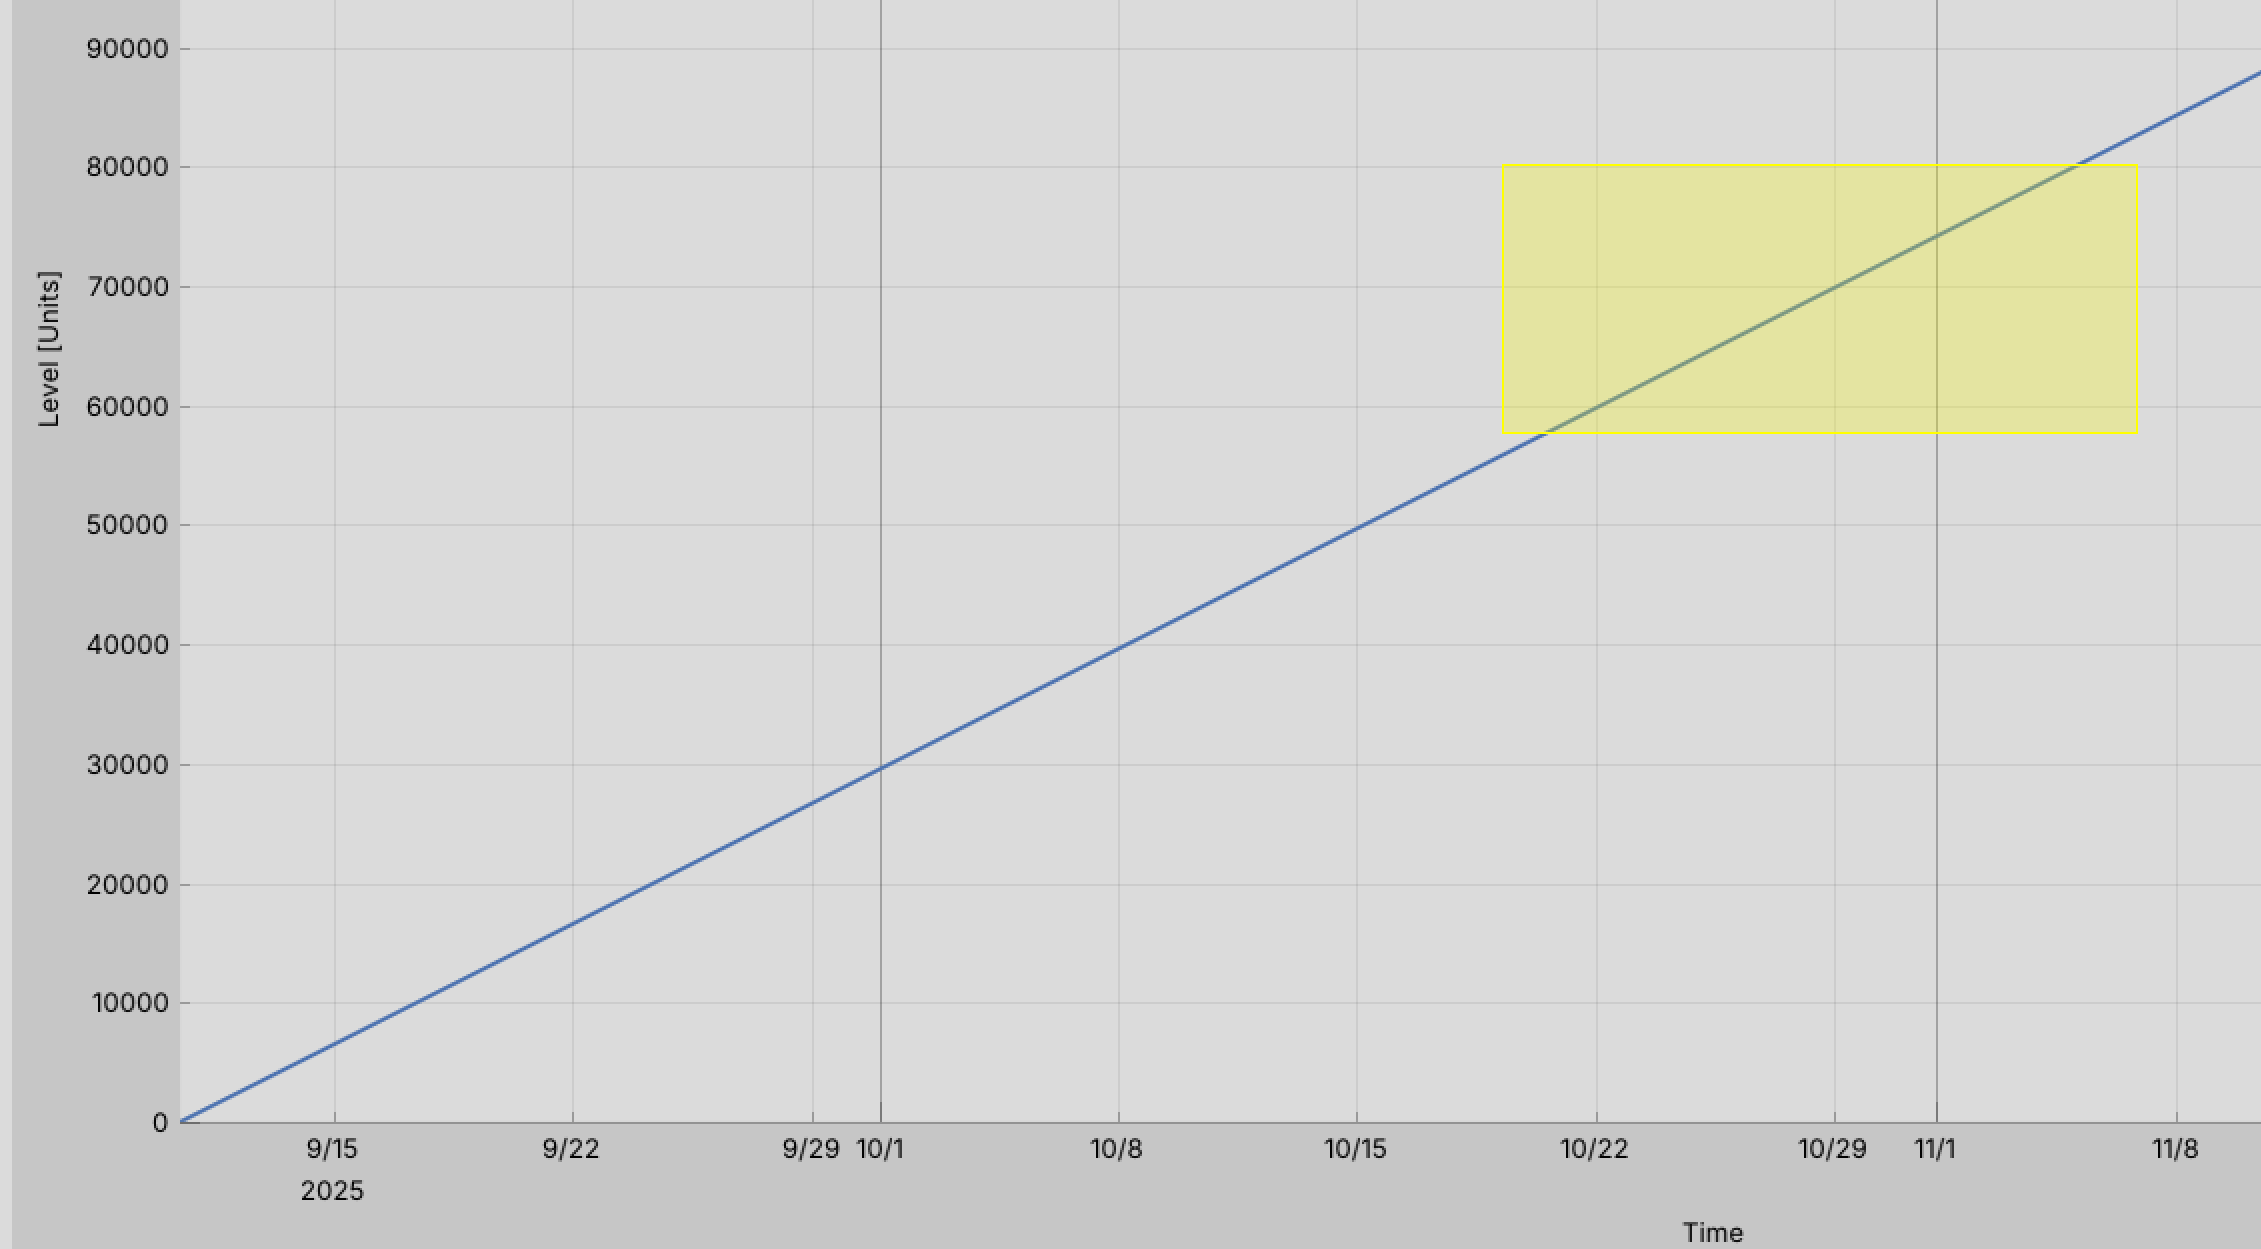
The yellow highlight shows the selected region. On release, the plot zooms to show only that area. Use the Auto-Fit option in the axis context menus (below) to reset the zoom back to the full data range.
Axis and Chart Context Menus
Right-clicking on different parts of a plot window opens context menus with options for scaling, display, and formatting.
X-Axis Context Menu
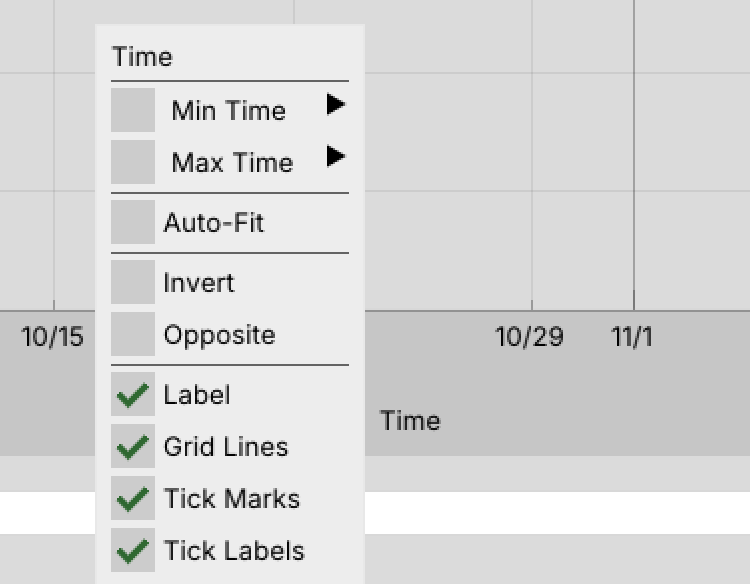
Right-click on the X-axis (typically the Time axis) to open its context menu:
| Option | Description |
|---|---|
| Min Time / Max Time | Set the visible time range manually |
| Auto-Fit | Automatically scale the axis to fit the data |
| Invert | Reverse the axis direction |
| Opposite | Move the axis to the opposite side of the plot |
| Label | Toggle the axis title (e.g., "Time") |
| Grid Lines | Toggle vertical grid lines |
| Tick Marks | Toggle tick marks along the axis |
| Tick Labels | Toggle the numeric labels at each tick |
Y-Axis Context Menu
Right-click on the Y-axis (e.g., Level, Flow Rate) to open its context menu:
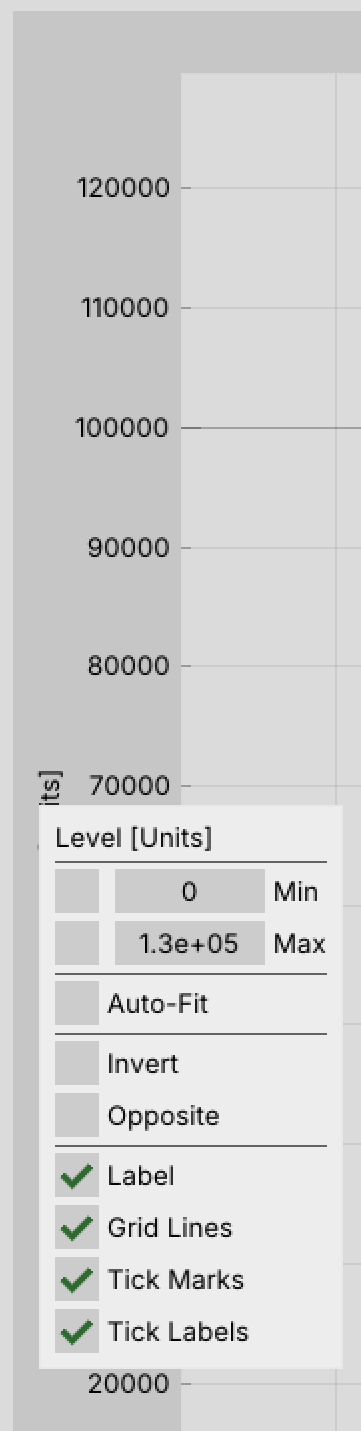
The Y-axis menu has the same options as the X-axis but applies to the vertical scale. Use Min / Max to set a fixed value range, or Auto-Fit to let the axis scale to your data. Invert is useful when you want higher values at the bottom (e.g., for depth-style plots).
Chart Area Context Menu
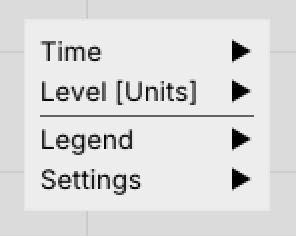
Right-click inside the plot area (not on an axis) to open the chart-level context menu:
| Submenu | Description |
|---|---|
| Time | Opens the same options as the X-axis context menu |
| Level [Units] | Opens the same options as the Y-axis context menu |
| Legend | Control legend visibility and positioning |
| Settings | General plot display settings |
This menu provides a single access point for all axis and plot settings without needing to right-click precisely on a specific axis.
Touchpad Guide: Rectangle Drag Operations
On a laptop with only a touchpad, rectangle-drag operations can be tricky—especially right-click + drag. Here are several reliable methods.
Left-Click + Drag
Tap-Tap-Drag
- Tap the touchpad once.
- Tap again immediately, but keep your finger down on the second tap.
- Drag your finger to define the rectangle.
- Lift your finger to release.
This is the most natural method and works on nearly all Windows Precision Touchpads.
Physical Click + Drag
- Press the touchpad surface down (physical click) in the lower-left area or center.
- While holding the click, slide your finger to drag.
- Release to finish.
This works reliably but can feel awkward since you are pressing and sliding simultaneously.
Click-Lock (Windows Setting)
If you find it hard to hold and drag, enable click-lock:
- Open Settings → Bluetooth & devices → Touchpad → Taps.
- Enable "Tap twice and drag to multi-select" (wording may vary by driver).
With this enabled, a double-tap locks the click state so you can drag without holding pressure, and a single tap releases it.
Right-Click + Drag
This is the more challenging gesture on a touchpad, since right-click and drag are not naturally combined in standard touchpad gestures.
Bottom-Right Corner Press + Second Finger Drag
Most Windows Precision Touchpads treat the bottom-right corner as a right-click zone.
- Press and hold the bottom-right corner of the touchpad with one finger (e.g., your thumb).
- With a second finger, drag across the touchpad to define the rectangle.
- Release both fingers to finish.
This works on most modern Windows laptops (Dell, Lenovo, HP, ASUS, Surface) that use Windows Precision Touchpad drivers. You can verify you have a Precision Touchpad by checking Settings → Bluetooth & devices → Touchpad—if you see Microsoft-style gesture options, you have one.
Two-Finger Tap-Hold + Drag
On some touchpad drivers, you can initiate a right-click by tapping with two fingers and then transition into a drag:
- Tap with two fingers on the touchpad.
- Immediately lift one finger while keeping the other held down.
- Drag the remaining finger to define the rectangle.
- Lift to release.
This method is inconsistent across drivers and hardware. It works well on some Dell and Lenovo models but may not register correctly on others.
Keyboard Modifier with AutoHotkey
If the touchpad methods feel unreliable, you can use a small AutoHotkey script to turn a keyboard key into a right-mouse-button modifier:
- Install AutoHotkey (v2 recommended).
- Create a script file (e.g.,
right-drag.ahk) with the following content:
; AutoHotkey v2
; Hold F12 to convert touchpad drag into a right-click drag.
; Press F12 before starting the drag, release after finishing.

F12:: {
    Send "{RButton down}"
    KeyWait "F12"
    Send "{RButton up}"
}
- Run the script.
- To rectangle-drag in a ReliaSim plot: hold F12, drag on the touchpad, then release F12.
You can substitute any key you prefer (e.g., CapsLock, ScrollLock, or a function key you don't use).
External Mouse
If rectangle-drag operations are a frequent part of your workflow, a small USB or Bluetooth travel mouse is the most practical solution.
Touchpad Troubleshooting
| Problem | Solution |
|---|---|
| Bottom-right corner doesn't right-click | Check Settings → Bluetooth & devices → Touchpad → Taps and ensure the right-click zone is enabled |
| Two-finger tap doesn't register as right-click | Verify that "Tap with two fingers to right-click" is enabled in touchpad settings |
| Drag gestures aren't smooth | Increase touchpad sensitivity in Settings → Bluetooth & devices → Touchpad and update your touchpad drivers |
| None of the built-in methods work | Use the AutoHotkey approach described above |
Summary
| Operation | Recommended Method | Reliability |
|---|---|---|
| Left-click + drag | Tap-tap-drag | High — works on all touchpads |
| Right-click + drag | Bottom-right corner + second finger | Medium — depends on touchpad size |
| Right-click + drag | AutoHotkey keyboard modifier | High — works on all touchpads |
| Right-click + drag | External mouse | High — eliminates the problem entirely |